
Building a real-time App with AWS Lambda, WebSocket APIs, and DynamoDB
The fastest, easiest and most straightforward path to building real-time APIs

AWS provides a powerful suite of services to build real-time apps.
There are many different options. But perhaps the most straightforward path is using AWS Lambda with an API Gateway Websocket.
In this article, let’s take a look at building a simple real-time API to be able to write and read data in real time.
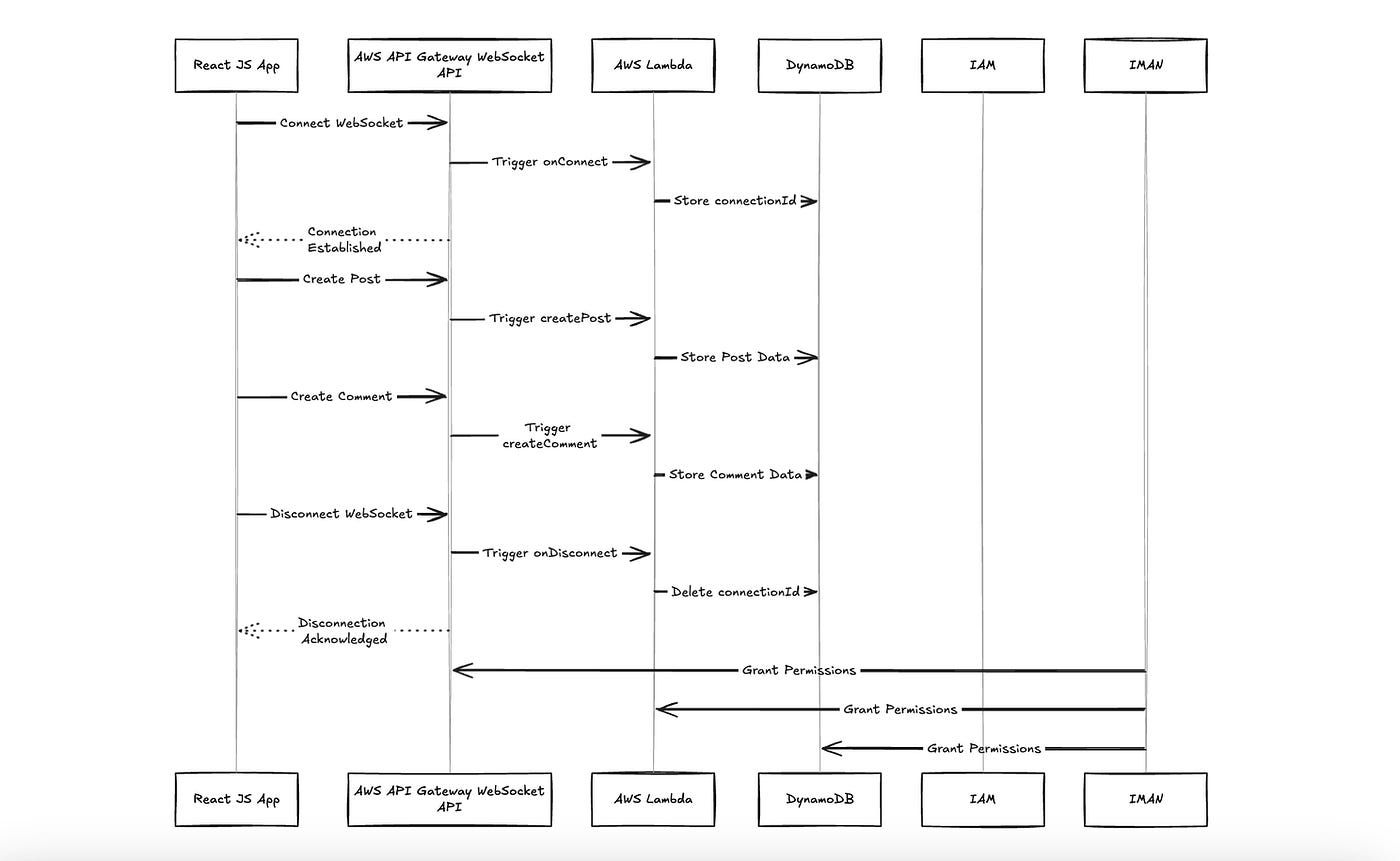
Let’s take a quick look at the architecture for this solution.

Solutions architecture for real-time blogging app
In the article below, I’ll go through each of these elements and explain them one by one.
Let’s dive right in.
Step 1: Create a WebSocket API
In the AWS console, navigate to the API Gateway service.
On the landing page, click on the Create API button.

Choose the Websocket API type and click on Build.

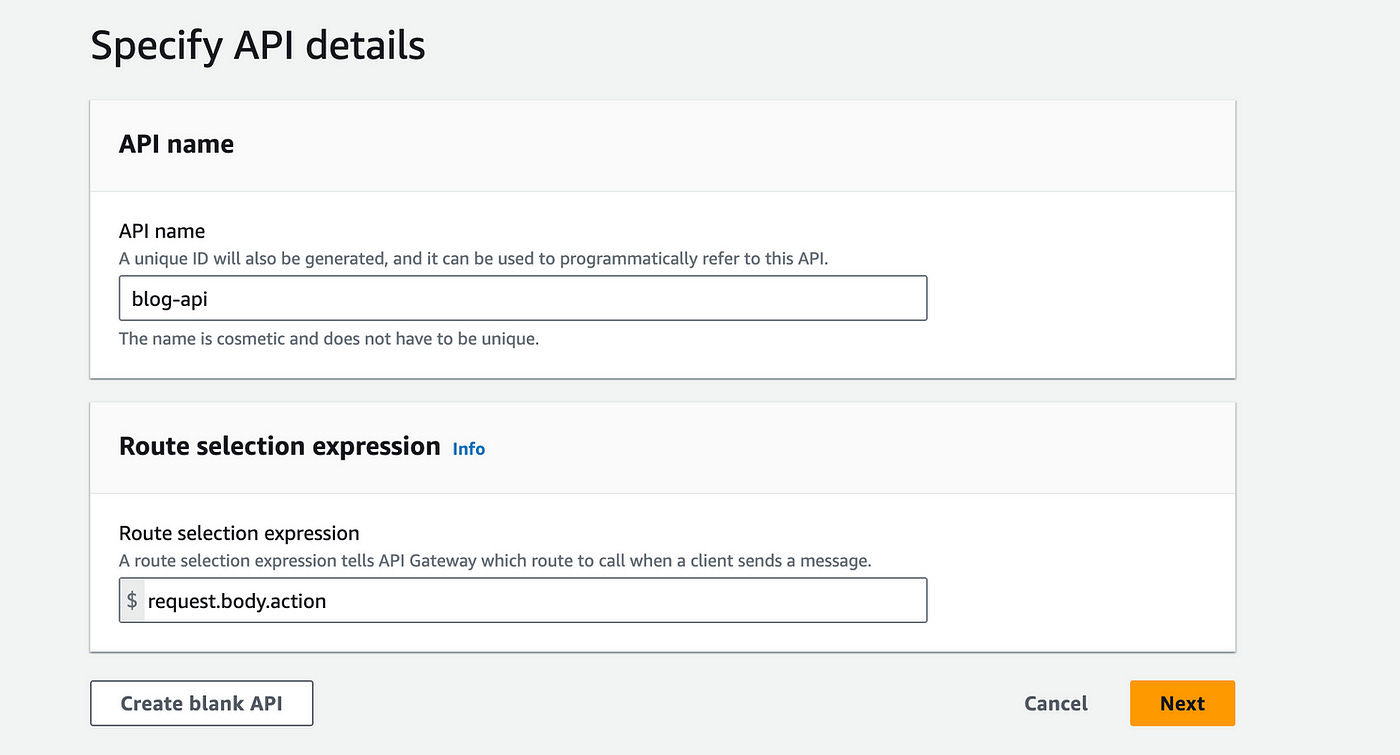
On the next page, name your API: I’ll name it “blog-api”.
Then under Route selection expression, enter “request.body.action” (like the placeholder shows).
This expression helps route incoming Websocket messages based on the action field in the message body (we’ll see this later in the Lambda function code).
Let’s now define the websocket routes.
Routes in websocket APIs are like HTTP methods in REST APIs (e.g., GET, POST).
The common routes include:
$connect — called when a client connects to the websocket.
$disconnect — called when a client disconnects from the websocket.
Custom routes — define routes based on message types.
Let’s add the following routes:
$connect — for client connections.
$disconnect — for client disconnections.
createPost — custom route for creating posts.

Predefined routes in API Gateway

Custom routes
On the next page, we will be prompted to attach integrations to each of the routes we are creating. This way when a user calls the connect endpoint, a Lambda function will be invoked and connect the user to our websocket.
Similarly, when a user disconnects, they will invoke a Lambda function to disconnect them from our websocket.
When a user calls the createPost endpoint, a Lambda function will also be triggered to create a post.
Let’s see how to do this in step 2 below.
Step 2: Integrate Lambda with Websocket API
We’ll keep our current tab open — in the middle of the API Gateway Websocket creation process — to create the Lambda function we need.
For the sake of simplicity, I’ll combine the 3 different methods into one Lambda function (instead of creating an individual Lambda function for each method).
Open a new tab with the AWS console again.
This time navigate to AWS Lambda.
Create a new Lambda function.

Name the function “blog-api”.
Use the Node JS 20.x runtime.
Under permissions, use or create a new role that gives Lambda permissions to access API Gateway (here’s a quick and easy guide on doing this).
Let’s dive right into the code:
import { ApiGatewayManagementApiClient, PostToConnectionCommand } from '@aws-sdk/client-apigatewaymanagementapi';
import { DynamoDBClient, PutItemCommand, DeleteItemCommand, ScanCommand } from '@aws-sdk/client-dynamodb';
const ddbClient = new DynamoDBClient({ region: 'us-east-1' });export const handler = async (event) => {
  const routeKey = event.requestContext.routeKey;
  const connectionId = event.requestContext.connectionId;
  const domainName = event.requestContext.domainName;
  const stage = event.requestContext.stage;

  const apiGatewayClient = new ApiGatewayManagementApiClient({
    endpoint: `https://${domainName}/${stage}`,
  });  switch (routeKey) {
    case '$connect':
      return handleConnect(connectionId);    case '$disconnect':
      return handleDisconnect(connectionId);    case 'createPost':
      return handleCreatePost(event, apiGatewayClient);    default:
      return {
        statusCode: 400,
        body: `Unknown route: ${routeKey}`,
      };
  }
};const handleConnect = async (connectionId) => {
  //create a dynamodb table called "BlogConnections" before (with connectionId as partition key)
    const params = {
      TableName: 'BlogConnections',
      Item: {
        connectionId: { S: connectionId },
      },
    };
    await ddbClient.send(new PutItemCommand(params));    return {
      statusCode: 200,
      body: 'Connected',
    };
};const handleDisconnect = async (connectionId) => {
    const params = {
      TableName: 'BlogConnections',
      Key: {
        connectionId: { S: connectionId },
      },
    };
    await ddbClient.send(new DeleteItemCommand(params));    return {
      statusCode: 200,
      body: 'Disconnected',
    };
};const handleCreatePost = async (event, apiGatewayClient) => {
  const postData = JSON.parse(event.body).data;  try {
    const params = {
      TableName: 'BlogConnections',
    };
    const connectionsData = await ddbClient.send(new ScanCommand(params));
    const connectionIds = connectionsData.Items.map(item => item.connectionId.S);    const postCalls = connectionIds.map(async (connId) => {
      try {
        const command = new PostToConnectionCommand({
          ConnectionId: connId,
          Data: Buffer.from(postData),
        });
        await apiGatewayClient.send(command);
        const params = {
          TableName: 'BlogConnections',
          Item: {
            connectionId: { S: connId },
            text: { S: postData },
          },
        };
        await ddbClient.send(new PutItemCommand(params));
      } catch (err) {
        if (err.$metadata.httpStatusCode === 410) {
          // Stale connection, clean it up from the database
          console.log(`Stale connection found: ${connId}, cleaning up...`);
          await ddbClient.send(new DeleteItemCommand({
            TableName: 'BlogConnections',
            Key: {
              connectionId: { S: connId },
            },
          }));
        } else {
          console.error(`Failed to send message to connection ${connId}:`, err);
        }
      }
    });    await Promise.all(postCalls);    return {
      statusCode: 200,
      body: 'Message sent to all connections',
    };
  } catch (err) {
    console.error('Error in handleSendMessage:', err);
    return {
      statusCode: 500,
      body: 'Failed to send message',
    };
  }
};
The code above contains 4 logical chunks:
At the top, we import the aws-sdk (v3) to get the DynamoDB and API Gateway API client libraries.
The first function gets a connectionId from API Gateway and stores it in DynamoDB.
The second function gets a connectionId and deletes it from DynamoDB.
The third function gets the postData object from the frontend client and sends the data to the websocket and to the DynamoDB table as well.
Save and deploy this code.
Let’s now head back into our previous tab — where we left off on attaching the integrations of our routes.
Choose the same Lambda function “blog-api” for all 3 methods.
On the next page, we can create a stage — call it “production” and click on next.

On the next page you can review the API details and click the Create and deploy button.
Step 3: Create DynamoDB table
Let’s quickly create a DynamoDB table that will hold the connectionIds for our websocket.
In the DynamoDB console in AWS, click on Create table.

On the creation page, name the table “BlogConnections” and define the partition key as “connectionId”.

Leave the rest of the configuration settings as they are and click on Create to create the table.
That’s all we need to do in DynamoDB.
Step 5: Testing the Websocket with a client app
The final piece of this solution is creating a basic client frontend with which to interact with our websocket (and create posts).
I’ve created a basic React App to run the client code:
import React, { useEffect, useState } from 'react';const WebSocketComponent = () => {
  const [socket, setSocket] = useState(null);
  const [postText, setPostText] = useState('');
  const [blogPosts, setBlogPosts] = useState([]);  useEffect(() => {
    // Create the WebSocket connection when the component mounts
    const ws = new WebSocket('wss://<api-id>.execute-api.<region>.amazonaws.com/<stage>');    // Connection opened
    ws.onopen = () => {
      console.log('Connected to WebSocket');
    };    // Listen for posts
    ws.onmessage = (event) => {
      console.log('Post received:', event.data);
      setBlogPosts((prev) => [...prev, event.data]);
    };    ws.onclose = () => {
      console.log('Disconnected from WebSocket');
    };
    return () => {
      ws.close();
    };
  }, []);  const writePost = () => {
    if (socket && socket.readyState === WebSocket.OPEN) {
      socket.send(JSON.stringify({ action: 'createPost', data: postText }));
      setPostText('');
    } else {
      console.error('WebSocket connection is not open');
    }
  };  useEffect(() => {
    const ws = new WebSocket('wss://<api-id>.execute-api.<region>.amazonaws.com/<stage>');
    setSocket(ws);
    return () => {
      ws.close();
    };
  }, []);  return (
    <div>
      <h2>WebSocket Blog Post Demo</h2>
      <input
        type="text"
        value={postText}
        onChange={(e) => setPostText(e.target.value)}
        placeholder="Write a post"
      />
      <button onClick={writePost}>Write Post</button>      <div>
        <h3>Blog Posts</h3>
        <ul>
          {blogPosts.map((msg, index) => (
            <li key={index}>{msg}</li>
          ))}
        </ul>
      </div>
    </div>
  );
};export default WebSocketComponent;
Run the app by writing a post. Open a second browser (or tab) to see if the websocket is working and listening to the new data.
You should see a “Connected to websocket” message in the console when you open a new tab or browser. When you create a new post, you should also see that reflected in the second browser or tab.
Here’s a screenshot of my demo. The Websocket is active and listening to data across my 2 browsers.

Conclusion
In this article, I guide you through building a simple real-time API using AWS Lambda and API Gateway WebSockets.
I provide step-by-step instructions for creating a WebSocket API, integrating Lambda functions, setting up a DynamoDB table to store WebSocket connection IDs, and testing the solution with a React app client.
I encourage you to follow along and build this with me as real-time API comes in handy in almost every web app.
👋 My name is Uriel Bitton and I’m committed to helping you master Serverless, Cloud Computing, and AWS.
🚀 If you want to learn how to build serverless, scalable, and resilient applications, you can also follow me on Linkedin for valuable daily posts.
Thanks for reading and see you in the next one!