
Building A Real-Time Notifications Microservice With AWS Lambda & API Gateway
The fastest and easiest way to build a notifications feature on your web app


Let’s look at how to build a real-time notifications microservice with AWS.
Our system will let users create notifications (in the form of a message), store that message to our database and send it to our Websocket API.
Users connected to the WebSocket will then receive the notification message in real-time in their account on the web app.
Architecture Overview

Here’s a breakdown of the design process:
A user sends a message from a frontend application.
This invokes the “createMessage” endpoint on our API Gateway Websocket API.
In turn that will trigger a Lambda function to store the message on DynamoDB.
All concerned users connect to the websocket API and receive the messages sent by other users on the web app.
How will the API Gateway Websockets work?

When a user connects to our websocket API through API Gateway, API GW will route the connection to the underlying server.
If the connection is successful, API GW will return a connectionId to the client/user.
With this connectionId, the user can then call an endpoint on the websocket API, like “createMessage”.
This will send a message to all users with the same connectionId.
Let’s now start implementing this solution.
We’ll need to use 4 AWS services for this solution:
Amazon DynamoDB
AWS Lambda
AWS API Gateway (Websocket API)
AWS IAM (roles and permissions)
1. Create a DynamoDB table
Log in to your AWS console and head over to the Amazon DynamoDB service.
Let’s create a new table here.

On the create table page, name the table “notifications” and define the partition key as “pk” and sort key as “sk”.
This primary key design allows us to get all notifications, connectionIds and users all stored in one table.
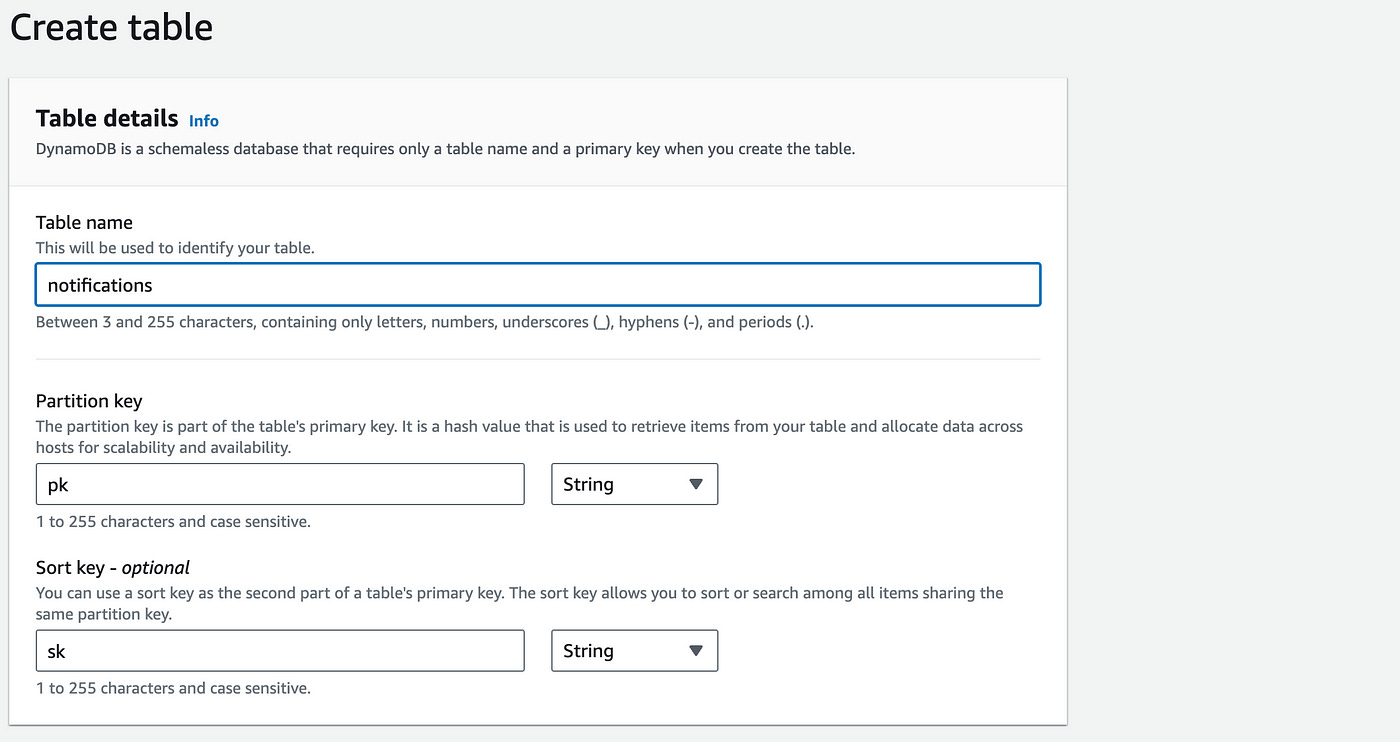
Leave the rest of the settings as they are and click on Create table.
Let’s now setup our API Gateway.
2. Setup API Gateway Websocket API
Head over to the API Gateway service.
Create a new API:

In the Choose an API type, choose the WebSocket API and click on Build.

In the next page, name the API “notifications-api” and for the route selection expression enter “request.body.action”.

On the next page, add the $connect and $disconnect routes. Add a custom route also and call it “sendNotification”.

On the following page, for each route, under integration type, choose Lambda from the dropdown select.

Leave this tab open, we’re going to open a new tab and create a Lambda function which we will then attach to these 3 routes.
3. Create AWS Lambda functions
In a new browser tab, navigate to the Lambda service.
Create a new Lambda function.
Use the following configuration:
Author from scratch
Name the function “send-notifications”
Use the Node JS 20.x runtime
Add permissions for the function to read and write to DynamoDB in IAM (quick guide here).

Create the function.
In the function page, under Source code in the code editor, let’s add the following code:
import {
  DynamoDBClient,
  PutItemCommand,
  DeleteItemCommand,
  QueryCommand,
} from "@aws-sdk/client-dynamodb";
import { ApiGatewayManagementApiClient, PostToConnectionCommand } from "@aws-sdk/client-apigatewaymanagementapi";
import { unmarshall } from "@aws-sdk/util-dynamodb";

const dynamoDbClient = new DynamoDBClient({});
let apiGatewayClient;
const TableName = "notifications";

// Main handler
export const handler = async (event) => {
  const routeKey = event.requestContext.routeKey;
  const connectionId = event.requestContext.connectionId;
  const userId = event.queryStringParameters?.userId || JSON.parse(event.body).userId;

  if (!apiGatewayClient) {
    apiGatewayClient = new ApiGatewayManagementApiClient({
      endpoint: `${event.requestContext.domainName}/${event.requestContext.stage}`,
    });
  }

  try {
    if (routeKey === "$connect") {
      return await handleConnect(connectionId, userId);
    } else if (routeKey === "$disconnect") {
      return await handleDisconnect(connectionId, userId);
    } else if (routeKey === "sendNotification") {
      const { message } = JSON.parse(event.body);
      return await handleSendNotification(userId, message);
    } else {
      return { statusCode: 400, body: "Invalid route" };
    }
  } catch (error) {
    console.error("Error processing request:", error);
    return { statusCode: 500, body: "Internal server error" };
  }
};

// Handle connection: store connectionId in DynamoDB
async function handleConnect(connectionId, userId) {
  const params = {
    TableName,
    Item: {
      pk: { S: userId },
      sk: { S: connectionId },
    },
  };

  await dynamoDbClient.send(new PutItemCommand(params));
  return { statusCode: 200, body: "Connected" };
}

// Handle disconnection: delete connectionId from DynamoDB
async function handleDisconnect(connectionId, userId) {
  const params = {
    TableName,
    Key: {
      pk: { S: userId },
      sk: { S: connectionId },
    },
  };

  await dynamoDbClient.send(new DeleteItemCommand(params));
  return { statusCode: 200, body: "Disconnected" };
}

// Send notification: store in DynamoDB and push via WebSocket
async function handleSendNotification(userId, message) {
  const notificationId = new Date().toISOString();

  // Step 1: Store the notification in DynamoDB
  await dynamoDbClient.send(
    new PutItemCommand({
      TableName,
      Item: {
        pk: { S: userId },
        sk: { S: notificationId },
        message: { S: message },
        timestamp: { N: `${Date.now()}` },
      },
    })
  );

  // Step 2: Retrieve all connectionIds for the user
  const connections = await dynamoDbClient.send(
    new QueryCommand({
      TableName,
      KeyConditionExpression: "pk = :userId",
      ExpressionAttributeValues: {
        ":userId": { S: userId },
      },
    })
  );

  const connectionItems = connections.Items.map((item) => unmarshall(item));

  // Step 3: Send notification to all connectionIds
  const postCalls = connectionItems.map(async ({ connectionId }) => {
    try {
      await apiGatewayClient.send(
        new PostToConnectionCommand({
          ConnectionId: connectionId,
          Data: JSON.stringify({ notificationId, message }),
        })
      );
    } catch (e) {
      if (e.statusCode === 410) {
        // Remove stale connection
        await dynamoDbClient.send(
          new DeleteItemCommand({
            TableName,
            Key: {
              pk: { S: userId },
              sk: { S: connectionId },
            },
          })
        );
      }
    }
  });

  await Promise.all(postCalls);

  return { statusCode: 200, body: "Notification sent" };
}
Save the function and Deploy it by clicking the Deploy button at the left sidebar.

Let’s now head back to the previous tab with our API Gateway setup.
Now you can attach this Lambda function to each of these routes.

Click on Next and keep the stage name as production.
Click on Next again, review the details and then click on Create and deploy.
This will deploy the WebSocket API.
Next, in the left sidebar, click on the Stages menu link.
You’ll find the WebSocket URL on this page.

4. Testing On Frontend App
All that’s left now is to invoke our WebSocket API from a client side app.
Open up a new JavaScript app and copy the following code:
const webSocket = new WebSocket("wss://your-websocket-url.execute-api.region.amazonaws.com/production");

webSocket.onopen = () => {
    console.log("Connected to WebSocket");
};

webSocket.onmessage = (event) => {
    const data = JSON.parse(event.data);
    console.log("Received Notification:", data);
};

webSocket.onclose = () => {
    console.log("Disconnected from WebSocket");
};
Replace the URL on the first line with your actual WebSocket URL from API Gateway.
Summary
We’ve built a system that allows users to create and send notifications that are delivered in real-time to connected clients through an API Gateway WebSocket API.
The architecture includes storing notifications in DynamoDB, triggering a Lambda function to handle WebSocket connections and send notifications, and utilizing API Gateway to manage the WebSocket API.
👋 My name is Uriel Bitton and I’m committed to helping you master Serverless, Cloud Computing, and AWS.
🚀 If you want to learn how to build serverless, scalable, and resilient applications, you can also follow me on Linkedin for valuable daily posts.
Thanks for reading and see you in the next one!