
How To Create Lambda Layers For Your Serverless Functions
A quick and easy guide on setting up Lambda Layers for your Node JS Lambda functions in 3 simple steps.

Have you ever had to install and upload the same dependencies to multiple Lambda functions?
It's not the most efficient way of deploying serverless functions.
Managing dependencies and external libraries can become cumbersome.
But with Lambda Layers, this becomes a breeze and is truly a game changer.
Lambda Layers are a powerful feature of AWS Lambda used to improve and simplify the management of dependencies in your functions.
Layers lets you separate your application logic from your external libraries and dependencies.
The two greatest benefits of Layers are:
dependency management
redundancy
With Lambda Layers you can manage all of your dependencies on a single console.
You can also reuse dependencies as many times as you need across any and all of your Lambda functions, in an easy plug-and-play style.
I’ve noticed, however, that there are no existing guides on the internet on how to create Lambda Layers with Node JS — one of the most used runtimes for Lambda.
So how do you go about creating a Lambda Layer for your functions running on Node JS?
Here’s a quick and easy-to-follow guide in 3 simple steps:
1. Create The Dependency
Let’s start by creating and naming the folder for our dependency. I’ll be using the lodash library in this example, so I’ll create a new folder called “lodash”.
This part is very important: since we are using the Node JS runtime, we need to create a folder inside the lodash folder called “nodejs”.
Open your IDE from this “nodejs” folder and run the following command to install the lodash library:
npm i lodashThe lodash dependency will install.
When it is completed, you have to zip the contents of the root folder so we can upload it to Lambda.
We’ll then return to the root folder “lodash” and zip that folder.
Run the cd command to go back to the lodash folder:
cd ..Then run the following command to zip the folder:
zip -r lodash.zip . We’re now ready to upload the zip file to Lambda.
2. Upload as a Lambda Layer
In the AWS console, head over to the Lambda service.
In the left-hand sidebar you will see a menu link “Layers”, click on that.

Click on Create Layer to create a new layer.
On this page, name the layer “lodash” and add a description.
Then upload the zip file we just created.
You can leave the rest of the configurations blank as they are optional.

Click on Create to create the layer.
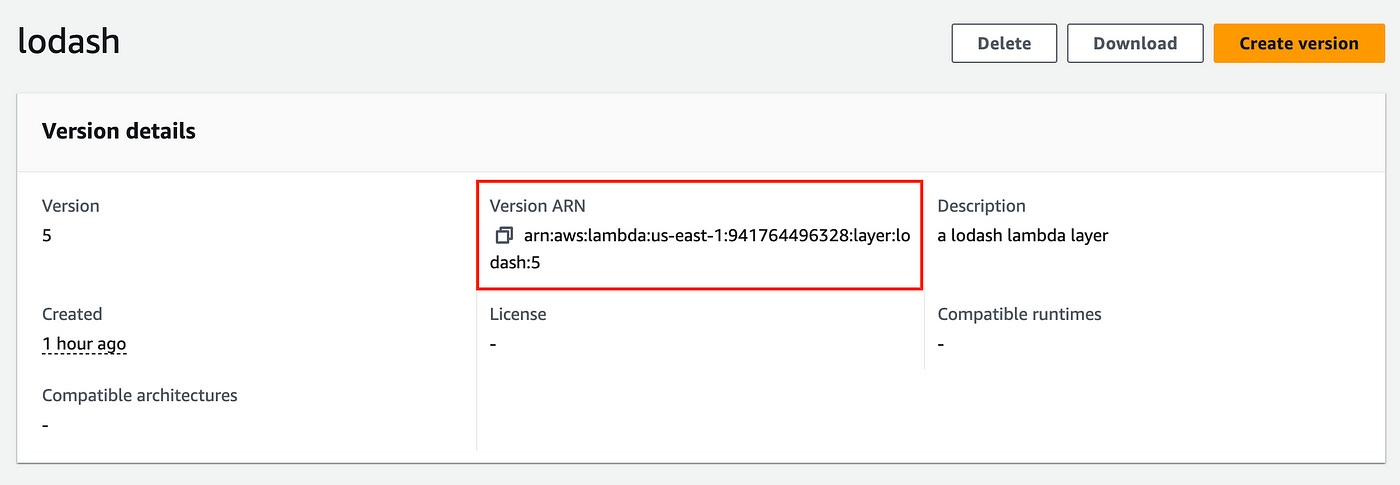
Going into this layer page, you can copy the Version ARN of this layer — we’ll use it in the Lambda function below.
3. Connect and Import
We can now connect a Lambda function with this layer to use it.
Let’s create a new Lambda function.
On the functions page click on Create function to create a new function.
Name the function “shuffle-array” and select the Node JS 20.x runtime.

Leave the rest of the configurations as they are and create the function.
You’ll be redirected to the page of the function you just created.

Click on the Layers (0) button to add a layer to this function.
This will scroll you down to the Layers section.

Click on the Add a Layer button.
On this page, you’ll be prompted to connect a Layer. Choose the Specify an ARN option and paste the ARN you copied earlier into the input below.
Click on verify to verify the layer.

Once that’s done you can click on the Add button to add the layer to your function.
Testing The Layer
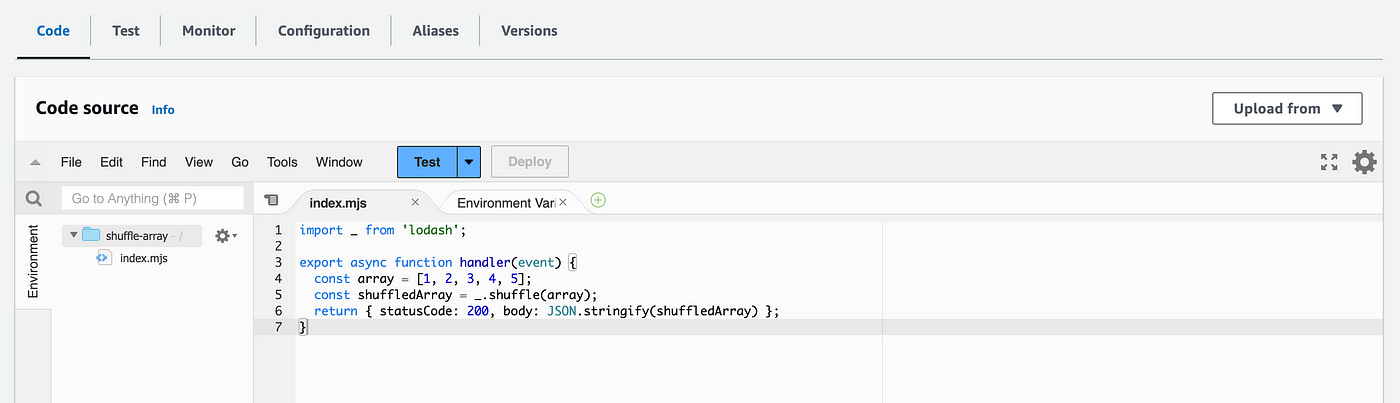
Lastly, we’ll copy the following code into our Lambda function to test the layer we just connected.
In the Code section above, enter the following code in the code editor:
import _ from 'lodash';

export async function handler(event) {
  const array = [1, 2, 3, 4, 5];
  const shuffledArray = _.shuffle(array);
  return { statusCode: 200, body: JSON.stringify(shuffledArray) };
}
This code will run a simple function from the lodash library to shuffle a given array.
Once you write that code, hit the Deploy button to deploy your Lambda function.
Let’s run a Test to verify our Lambda Layer is working well.
Click on the Test button above.
Simply give the name a test, don’t worry about the JSON below — leave it as it is and click on the Invoke button to run the test.

You should see a function execution tab in the Code editor with a similar output:

You have successfully used your lodash Lambda Layer as a dependency for your Lambda function.
Conclusion
In this guide, I explain how to easily create and integrate Lambda Layers with your Lambda functions to add the dependencies needed for your server-side code.
By leveraging Lambda Layers, you can simplify your dependency management and reduce redundancy across your AWS Lambda functions.
👋 My name is Uriel Bitton and I’m committed to helping you master Serverless, Cloud Computing, and AWS.
🚀 If you want to learn how to build serverless, scalable, and resilient applications, you can also follow me on Linkedin for valuable daily posts.
Thanks for reading and see you in the next one!