
How To Easily Add TTLs To Your Objects In Amazon S3
To have them expire automatically by AWS


Amazon S3 allows you to upload unlimited files (objects) to it for free.
As a customer, you only pay for data that goes out of S3 and storage costs.
Both costs are very low. However, the storage costs do add up over time.
If you have a scalable application, storage costs can quickly become significant.
One way to optimize this is to TTL your objects that may be temporary or irrelevant.
For example, I’m building an application for a client where they need to upload images to S3, analyze them, extract some data and then no longer have any use for these images.
This is a great use case for expiring them automatically with — you guessed it — TTL.
Let’s take a look in this article how to add TTLs to your objects in S3.
Overview
The general flow of how we can achieve object TTLs is through tagging:
We will upload a file to S3 with the PutObjectCommand
We’ll set a tag “ttl = true”
We’ll configure our S3 bucket to expire all items that have the TTL tag
Let’s start with creating an S3 bucket.
Create an S3 Bucket

In Amazon S3, click on Create bucket. Give the bucket a unique name, leave all the default configurations and hit the Create bucket button.
Navigate to your newly created bucket. Click on the management tab.

I already created the lifecycle, but to do it again click on the Create lifecycle rule button.
Configure the lifecycle as follows:
Enter a name for the rule, e.g. “ExpireTTLTaggedObjects”.
Select the option “Limit the scope of this rule using one or more filters”
Under Filter type, for Object tags enter a key: “ttl” and for the value: “true”.
Under Lifecycle rule actions, check the option “Expire current versions of objects”.
Under Expire current versions of objects, enter the number of days after which to expire the object, e.g. 1 (day).
Hit save to enable the lifecycle rule.
Now any object in this bucket that has a tag “ttl” set to true will automatically be deleted by S3 after 1 day of being created.
Next, we’ll be adding our files to this bucket through Lambda.
Create a Lambda function

In the Lambda service, create a new function.
Name it “upload-files-ttl” and use the Node JS runtime. Select the arm64 architecture as well.
For permissions, we will need to attach an IAM role with PutItem permissions.
Here’s a quick guide on how to do this.
When the function is created, scroll down to the code editor section below.

Uploading a file to S3
Here we’ll add the code necessary to upload an object to S3 and set the TTL tag.
import { S3Client, PutObjectCommand } from "@aws-sdk/client-s3"

const s3Client = new S3Client({ region: "us-east-1" })

export const handler = async (event) => {
  try {
    const bucketName = "my-s3-bucket"
    const fileName = "my-file.csv"
    const fileKey = `uploads/${Date.now()}-${fileName}`
    const csvData = "col1,col2\nval1,val2"

    await s3Client.send(new PutObjectCommand({
      Bucket: bucketName,
      Key: fileKey,
      Body: csvData,
      ContentType: "text/csv",
      ContentDisposition: `attachment; filename="${fileName}"`,
      Tagging: "ttl=true"
    }))

    return {
      statusCode: 200,
      body: JSON.stringify({
        message: "File uploaded successfully",
        key: fileKey
      })
    }
  } catch (err) {
    return {
      statusCode: 500,
      body: JSON.stringify({
        error: "Upload failed",
        details: err.message
      })
    }
  }
}
Notice how inside the PutObjectCommand we add a attribute “Tagging: “ttl=true” ”. This is how we tag the object with a TTL.
Go ahead and test it. As soon as you upload a file you should see it tagged in your S3 bucket.
Click on the file you just uploaded, you will see it tagged under Object management overview:
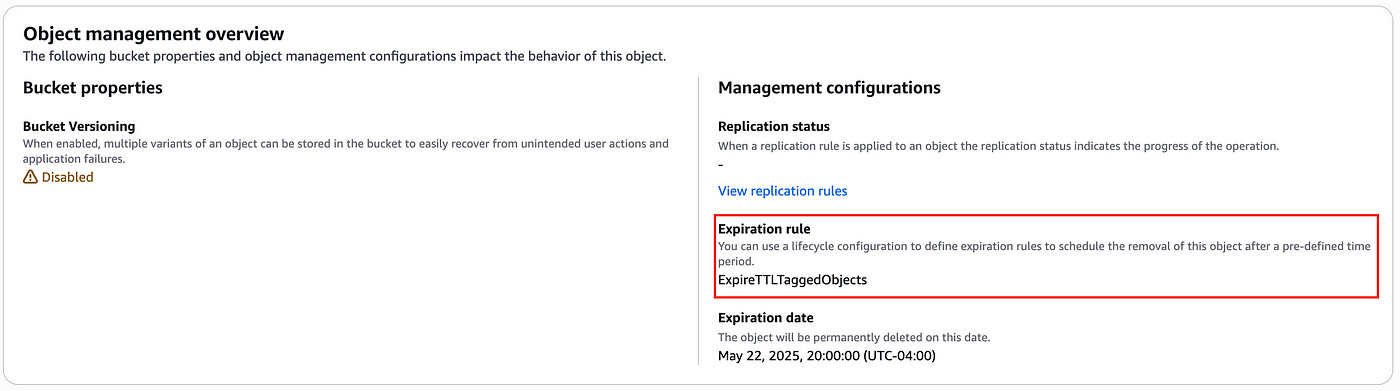
Under expiration date you can see it says the object will be deleted on May 22nd 2025 (tomorrow).
Conclusion
Adding TTL tags to your files in Amazon S3 is simple yet quite powerful.
TTLs allow you to automate the deletion of temporary data and keep storage costs under control.
This approach is simple, scalable and ideal for applications that deal with short-lived files.
👋 My name is Uriel Bitton and I’m committed to helping you master Serverless, Cloud Computing, and AWS.
🚀 If you want to learn how to build serverless, scalable, and resilient applications, you can also follow me on Linkedin for valuable daily posts.
Thanks for reading and see you in the next one!