
Two Ways To Use AWS Lambda For Scalable Serverless Functions
Learn the proper ways of using Lambda serverless functions within real applications.


AWS Lambda is a service provided by AWS that allows us to deploy serverless code, which can be used for a number of use cases.
Some popular use cases include responding to events, such as from DynamoDB or S3 (when data gets added to DynamoDB or a file is stored on S3), or by using it to call a function directly from your front end.
In this article, we’ll look at these two methods and how to set up your AWS Lambda accordingly.
1. Responding to Events
We’ll start by looking at how we can trigger some code on Lambda whenever an event occurs in S3, for example, a file upload.
Say we wish to write an item to DynamoDB with the details of the file uploaded to S3.
We can use Lambda to do this in a serverless manner.
Architectural Overview
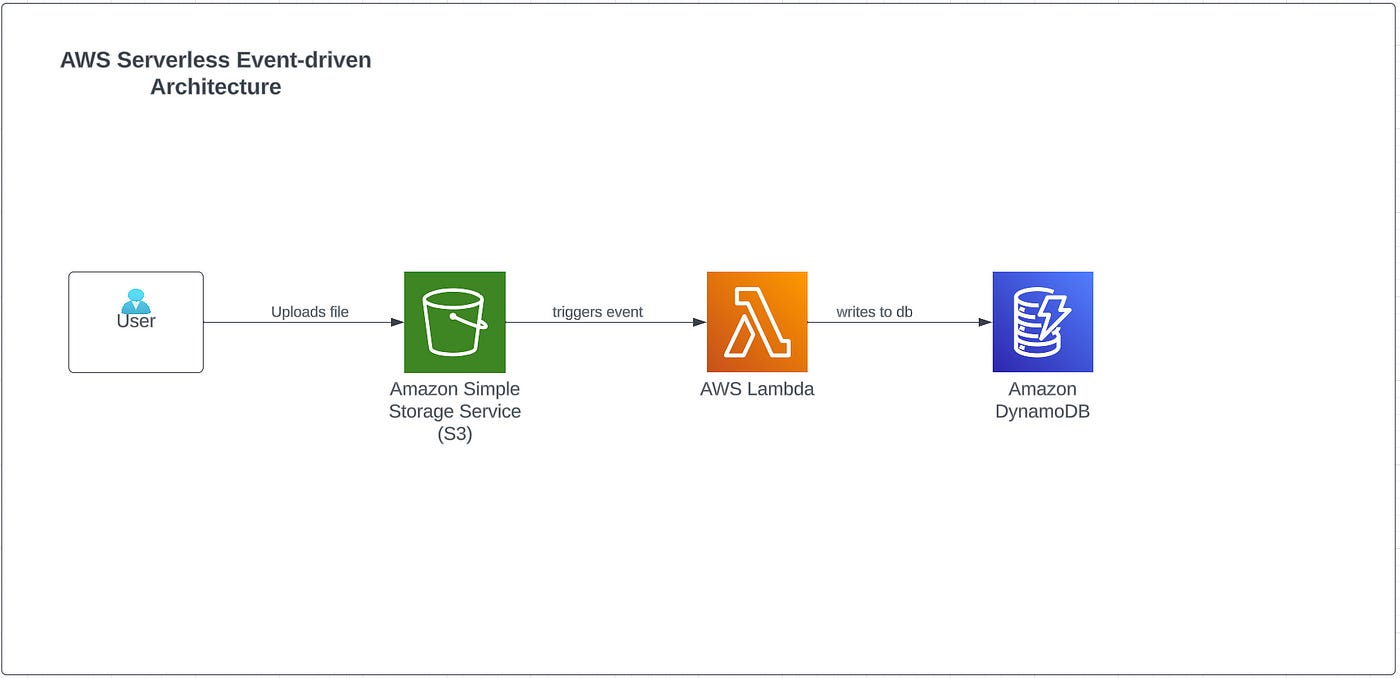
The user uploads a file to S3, this triggers a Lambda function to run some code in the cloud, which then makes a request to DynamoDB to write an item to a table.
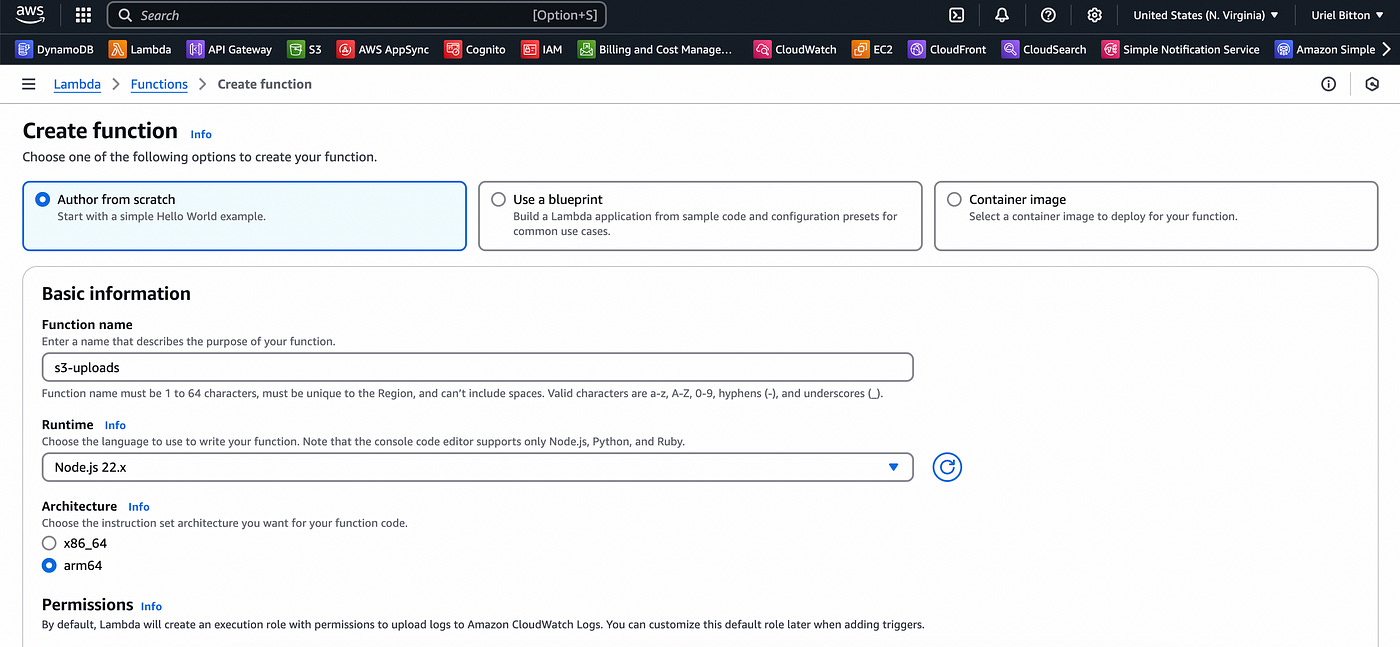
Step 1: Create A Lambda function
Create a new function in AWS Lambda with the following configuration:
Choose the “author from scratch” option.
Choose Node JS 22.
Use the ARM architecture
Under role, click on the IAM Console link on top of the select options and create a new role with LambdaFullAccess permissions, S3 read permissions and DynamoDB write permissions.
You can then select use existing role and choose the role you just created.
If you need help creating an IAM Role read this.
Click the Create function button at the bottom.
Step 2: Writing the server code
You’ll then be redirected to the function page which you just created. In the code section below paste the following code.
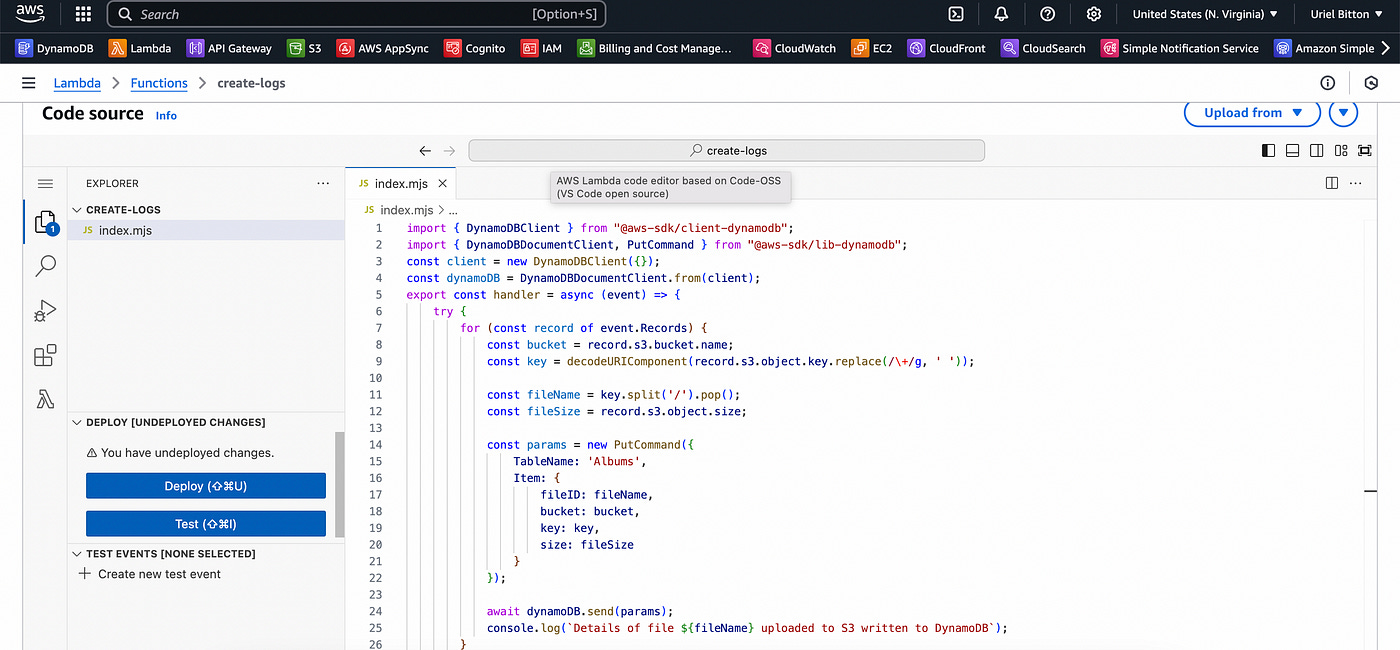
Code:
import { DynamoDBClient } from "@aws-sdk/client-dynamodb";
import { DynamoDBDocumentClient, PutCommand } from "@aws-sdk/lib-dynamodb";const client = new DynamoDBClient({});
const dynamoDB = DynamoDBDocumentClient.from(client);export const handler = async (event) => {
    try {
        for (const record of event.Records) {
            const bucket = record.s3.bucket.name;
            const key = decodeURIComponent(record.s3.object.key.replace(/\+/g, ' '));

            const fileName = key.split('/').pop();
            const fileSize = record.s3.object.size;

            const params = new PutCommand({
                TableName: 'Albums',
                Item: {
                    fileID: fileName,
                    bucket: bucket,
                    key: key,
                    size: fileSize
                }
            });

            await dynamoDB.send(params);
            console.log(`Details of file ${fileName} uploaded to S3 written to DynamoDB`);
        }

        return {
            statusCode: 200,
            body: JSON.stringify('S3 event processed successfully'),
        };
    } catch (error) {
        console.error('Error processing S3 event:', error);
        return {
            statusCode: 500,
            body: JSON.stringify('Error processing S3 event'),
        };
    }
};
The following code will let Lambda detect a file upload event in S3, save the file name of the file and write a bucket name and file size.
Finally, it makes a write request to DynamoDB and then returns the response on whether it was successful or not.
Click on the Deploy button to save the code.
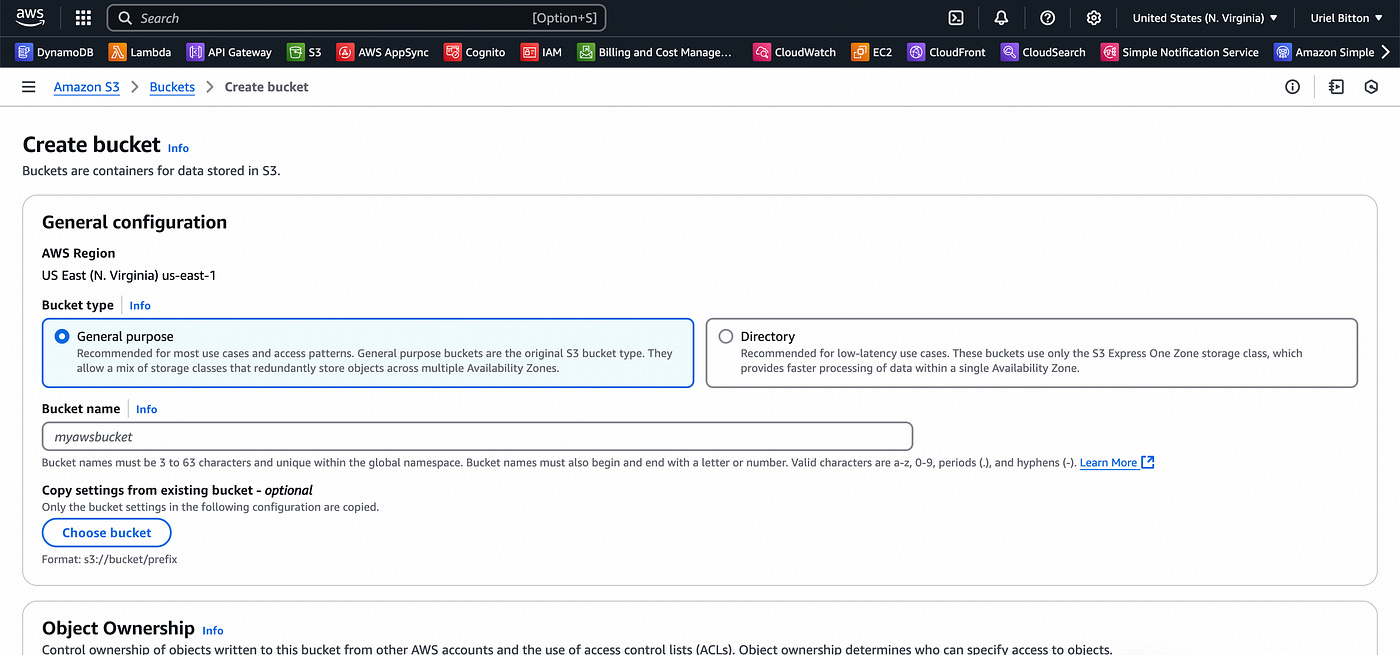
Step 3: Create S3 Bucket
In order for Lambda to react to the event of an S3 file upload we need to configure the event in our S3 bucket.
We’ll head over to the AWS S3 console.
Create a new bucket with a unique name and leave all the default options on.
On the new page, select your bucket from the list and click on properties, and then navigate to the event notifications section.
Create a new event notification. Add a name, and check the “All object create events” checkbox in Event Types.
In Destination (the last section below) choose Lambda function and select the lambda function we created in Step 1.
Click save changes and we’re done.
Step 4: Adding an S3 Trigger to Lambda
With the S3 bucket created, we need to add an S3 trigger to the Lambda function so it can detect S3 object uploads.
Scrolling back up to the Lambda function page, find the trigger button to add a trigger.
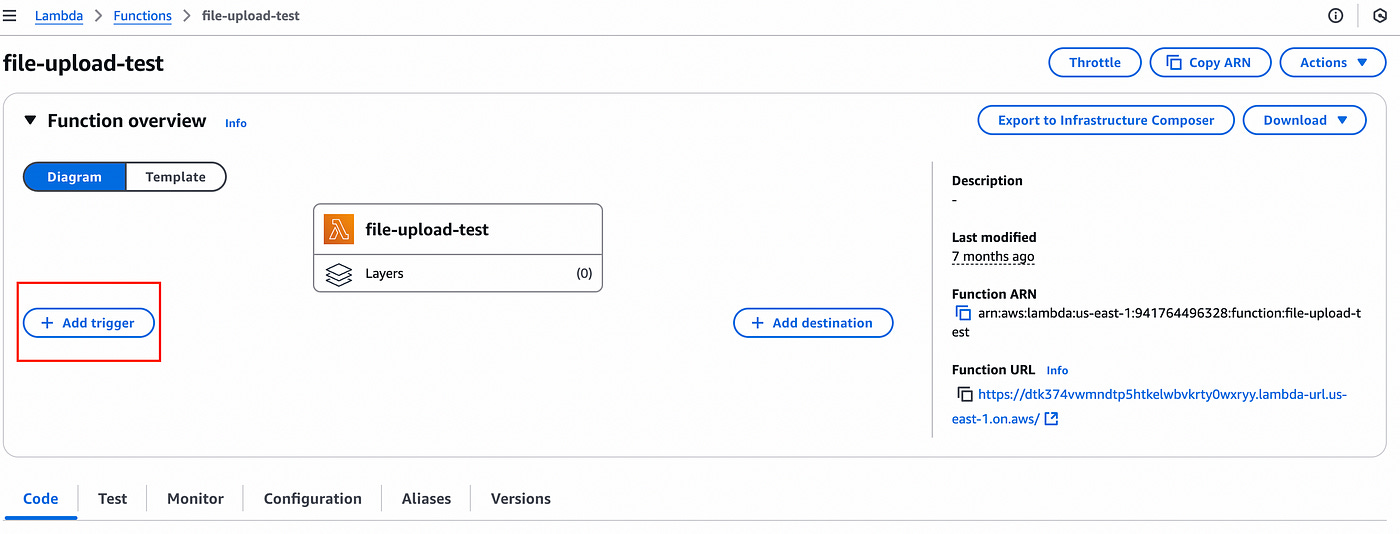
Here you can choose S3 from the dropdown. Then search and add the S3 bucket you just created.
Then at the bottom click on add to activate the trigger.
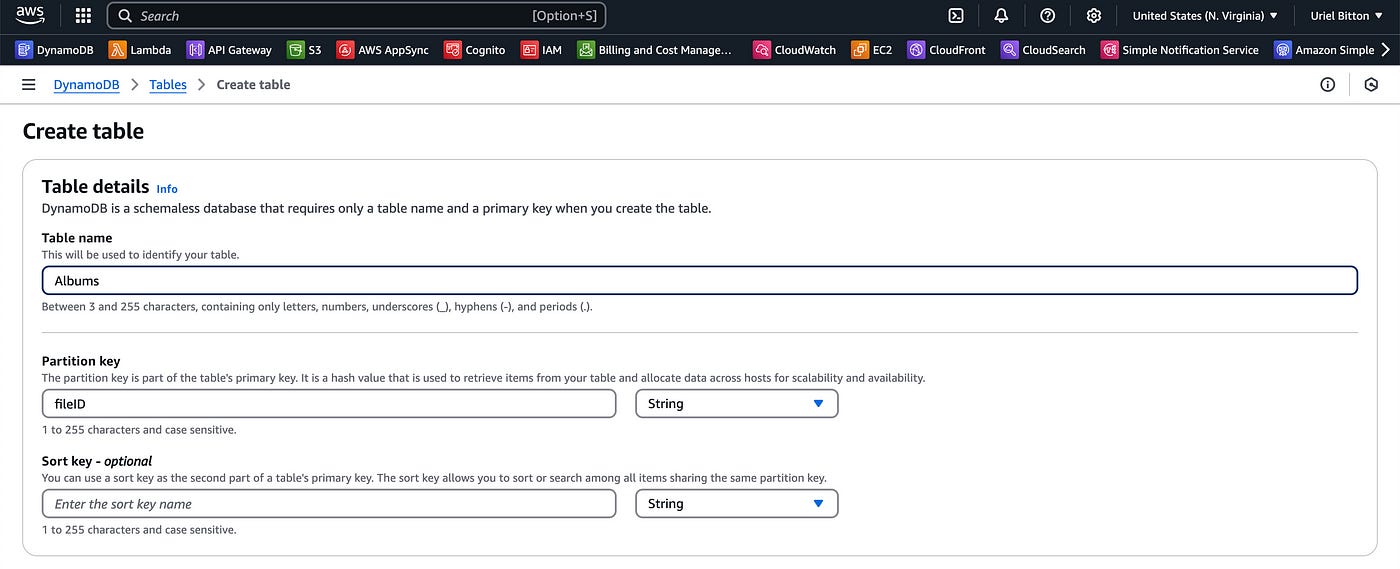
Step 5: Create a DynamoDB Table
Let’s quickly create a DynamoDB table in which to save the details on the item we will upload to S3.
In the DynamoDB console page select “Tables” on the left sidebar. Click Create Table.
Enter a table name (needs to match the table name in the code block above — I used “Albums”).
For the partition key enter “fileID”. Leave the default settings and click Create Table at the bottom.
Once the table is created we can execute our test and final step in this process.
Step 6: Testing Our Architecture
Our serverless flow is ready to be tested.
Upload a file to your S3 bucket by heading over to S3 and opening your bucket from the list and uploading a file.
When that is uploaded, in DynamoDB you should see the item in your Albums table.
Remember Lambda can read events from multiple other services not just S3 and so I encourage you to play around and discover how to integrate Lambda with other services on AWS.
2. Call Lambda code directly
Calling a Lambda function directly is much simpler and recently it has become even more simple.
In the past, we had to set up and configure AWS API Gateway to let our frontend application communicate with Lambda through endpoints in our API.
But with the recent release of Lambda function URLs, we can directly call a lambda function code directly from our frontend.
Let’s dive in straightaway into how to do this.
Create a new Lambda function with the following code:
import { DynamoDBClient } from "@aws-sdk/client-dynamodb";
import { DynamoDBDocumentClient, PutCommand } from "@aws-sdk/lib-dynamodb";

const client = new DynamoDBClient({});
const dynamoDB = DynamoDBDocumentClient.from(client);

export const handler = async (event) => {
    try {
        const userData = JSON.parse(event.body);

        const params = new PutCommand({
            TableName: "Users",
            Item: userData,
        });

        await dynamoDB.send(params);

        return {
            statusCode: 200,
            body: JSON.stringify('User added successfully'),
        };
    } catch (error) {
        console.error('Error adding user:', error);
        return {
            statusCode: 500,
            body: JSON.stringify('Error adding user'),
        };
    }
};
The above code accepts data from a POST request with some fields of a user’s info in the body object. It adds this data into a Users table and writes the data to DynamoDB.
In order to execute the following code we then need to create a function URL.
To do this we can scroll down the lambda function page, and click on the configurations tab.
On the left sidebar, you will have Function URL.
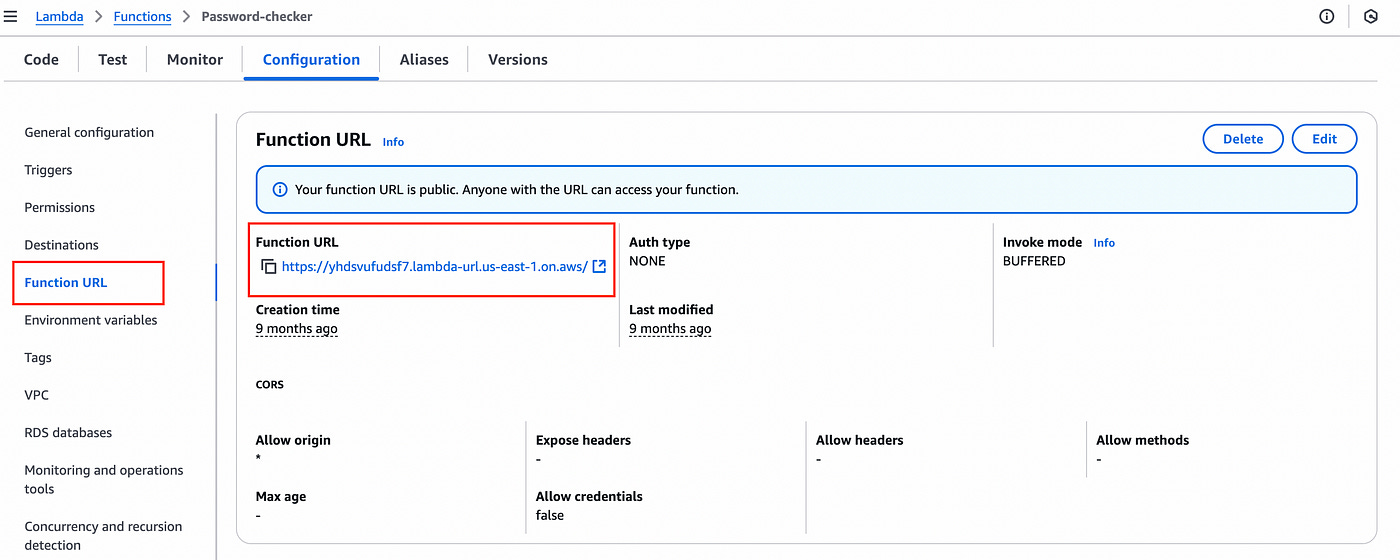
Click on the Create function URL button. For the auth type select none and then click on additional settings.
Check the “Configure cross-origin resource sharing (CORS)” option.
In the Allow methods section add the methods you will need (POST for our case).
Click on save to create the function URL.
Once that is done if you scroll up to the top of the page you will see in the function overview section a function URL.
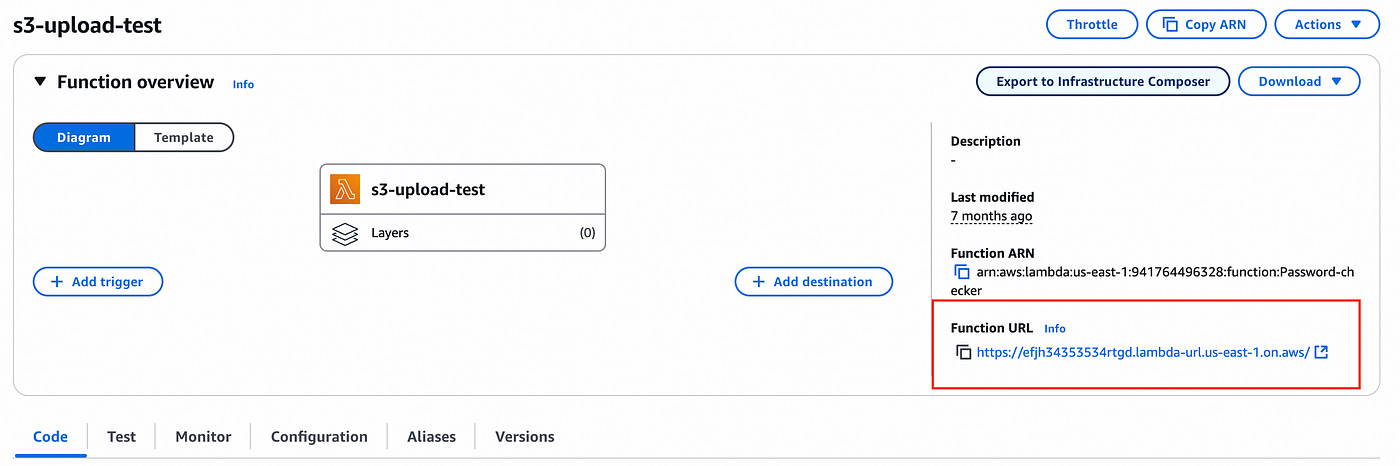
Copy that and use it in your fetch code where you would normally call the API endpoint to make a POST request. Your user data goes into the body parameter.
Make sure that your CORS configurations match and you are good to go.
(note: all function URLs have been deleted prior to this article’s publishing).
Conclusion
In this article, we saw how to create a serverless Lambda function which will let us perform different actions.
We saw how to create a lambda function to respond to integrated events from S3, on a file upload and write the data to DynamoDB.
We also saw how to create a function URL in order to call some serverless code in the cloud directly from our front-end application, without the need for an API.
These use cases make Lambda versatile, powerful and let’s us create server-side code quickly and easily.
👋 My name is Uriel Bitton and I’m committed to helping you master Serverless, Cloud Computing, and AWS.
🚀 If you want to learn how to build serverless, scalable, and resilient applications, you can also follow me on Linkedin for valuable daily posts.
Thanks for reading and see you in the next one!